The obvious thing about three point lighting is that it has three key points to it =
- The Key Light: 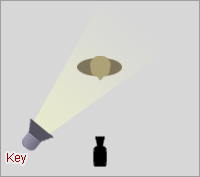
A Key light is the main source of light. It's the strongest and the light that does a lot of influence on the scene and subject. It's placed to the side of the camera so that the face of the subject is well lit up and leaves the other side in shadow.
- The Fill Light: 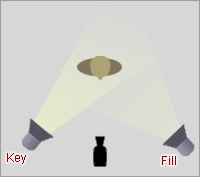
This light comes on second. It removes the shadows from the object - such as on an actor it removes the shadows cast by the faces features e.g: Nose, eyelashes, chin. The light is placed on the opposite side to the key light. The fill light is often less bright and more softer and is placed a little further back and away from the subject to create this effect.
- The Back Light: 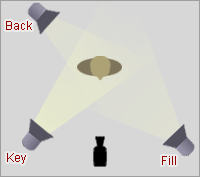
The back light is of course placed behind the subject. It's used to give the subject a more 3D look against the background. This gives the subject definition and it moulds around the object/actors outlines to allow you too see how far away the subject is from the background and camera and allows the viewer to separate background from subject.
Here my group made a small tutorial that explains/portrays three point lighting more clearly:
Reflectors
A Reflector is basically a piece of equipment that reflects light off either the key or back lights and onto the subject; this is often used as a fill light because they do the same job; removes the shadows from the subject that are left behind from the other lights. It can often be used also to simply reflect day light onto the subject; however day light can not always be reliable as the British weather CONSTANTLY changes...


A Reflector like this is used because its simple to use and proves to be rather good. As I said above they are mostly used to remove any remaining shadow that is left in the actor's face or on an object. HOWEVER:
have fun putting it away... it can be a real pain in the neck :)